Jaguar XK120, 'NUB 120', 50's rallying Ian & Pat Appleyard


NUB 120 still exists, as per the recent picture above.
There are several differences and/or later modifications to the iteration I have modelled - rear wheel covers removed, change to wire wheels, a louvred bonnet, different spot lamp configuration, reduced height rear rack and retro-fitted air louvres to route ventilation in to the footwells, just in front of the doors.
The car I have done is based on an earlier iteration of NUB 120, as per the 1951 RAC Rally - which it won.
This is as pictured to the right here.
Judging by the fittings, the car is almost certainly one of the very earliest XK120s i.e. an aluminium bodied one, rather than steel......
At this time, the car retained its rear wheel spats/covers, and the steel wheels, complete with chrome hubcaps.
For rallying, modifications from the road car included a quick-fill fuel cap, a rack on the rear deck behind the cockpit, uniquely positioned wing mirrors, a Klaxon horn between the front bumpers, a leather strap across the bonnet and, of course a pair of spot lamps plus RAC rally plates. And some mods inside, notably stop clocks on the passenger's side of the dashboard.

This slot car is based on a 1/32nd scale static plastic kit, the Revell 'Highway Pioneers' one ( inherited from Gowland & Gowland, as printed on the chassis ). The kit is excellent in terms of shape and dimension, albeit a bit skimpy on details.
The chassis is an MRRC one, from their earlier AC Cobra i.e. the chassis with a front-mounted engine. The chassis and drive shaft need extending by 1/4 inch to suit the XK120 wheelbase and to get the motor well under the bonnet.
Wheels - these are Ninco wires with classic tyres, but the front face of the wheel will be stripped off and the 'steel wheel' front of the static kit wheels will be added.
There's also an Airfix/MRRC Ackermann steering front axle unit to go on.


Working from the rear, firstly there's an improved boot lid handle. Then seal strip added round the number plate mount. The original rear bumber mounting post holes have been filled, and new posts added in the right place. New, correctly positioned Rear sidelights are 5 thou plastic card plus the rest carved from sprue. GB on bootlid cut from 20 thou plastic card. Rack made up from brass wire. The rack hides a new fuel cap mounting; original flat flap filled in, then a new angled tubular mount made from sprue. Note also around the cockpit edge are new and extra clips and pins to represent the fixings to hold hood, tonneau and sidescreens. The seal strips between wings and body have been replaced by some thicker stretched sprue. And, most obviously, the rear wheel spats have been cut out and replaced with thinner ones made from plastic card ( to increase clearance for wheels ).
Working from the front, the front valance has been glued on and the join filled in. Note black plastic card between the bumper posts, to add strength to bumpers once attached. The red bits under the grille are the wires for the spotlights. The headlights have been padded at the back to move them forward by 30 thou; headlamp bezels are small-scale tank wheels, drilled out with a 5mm drillbit; new strakes added. The sidelights are 5 thou plastic card plus tapered plastic rod. Between the sidelights are the bonnet strap mountings. Then further back down the top of the wings are small stubs for the wing mirrors. And just behind the shut line for the rear of the bonnet are two stubs to mount the windscreen wipers to.
And, overall, shut lines have been emphasised by scraping out with a sharp scalpel.
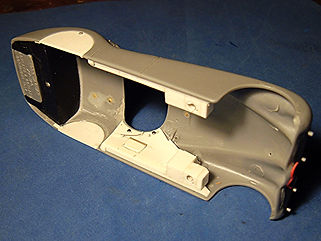
Underneath, I've added two rails running between the wheel arches, just above the bottom edge, for the cockpit base plate to butt against. Then I've plated in and added some interior door detail above these, details e.g. map pockets, door pulls, sidescreen fittings. Just behind the front wheel arches are two blocks of plastic card, to take holes for screws to hold the chassis on. The area underneath the boot / trunk has been boxed in; the box has some lead in it to help hold the tail of the slot car down, plus a third chassis mounting screw hole.


Here's the cockpit in place, showing where the base plate sits. It's held in place by being sandwiched between the body and chassis, making it removable for cleaning. Note the transmission tunnel has been cleaned out to make suitable space for the drive shaft on the chassis. The odd black bits on the bottom of the base plate are to align it with the chassis.
I've cut down the kit base plate, removing both ends, and cutting a suitable hole to clear the motor. As the the base plate is now mounted 3-4mm lower than it would have been on the static kit, I've jacked up the seats and the transmission tunnel by the same amount. I've added a black plastic vertical plate to screen off the motor. On this I've mounted the kit dash, modified to move the steering wheel over to the UK side, the passenger side plated up and discs of plastic card added for the timing/stop clocks, and a few more details / switches.


In the picture above right are all the peripheral details to go on to the shell. From left to right - number and rally plates made up on the computer, printed out on paper, covered in clear tape, and cut out and mounted on to plastic card. Bonnet strap. Chrome fuel cap. Front and rear bumpers from the kit, though the rear ones have had new mounting bits made up from scrap bendy metal strip. Klaxon horn (with the orange bit on) made up from odds & sods. Next to that, the kit rear numberplate lamp. Above right, the kit windscreen, modified, detailed and reinforced, plus hand-cut glazing from 30 thou clear sheet (tax disc on the inside of the passenger-side glass), plus a section of dressmaking pin that runs up through a block under the body up behind the central strut of the windscreen to strengthen it. Then below the glazing, spot lamps made up from odds and sods with lenses from chrome-backed craft cabochon stickons. Then wing mirrors made up from smaller cabochons, with bendy stems (nylon brush bristle) superglued on. And finally, far right, headlamp lenses - 5mm discs cut from thin clear sheet using a paper punch, detailed up with small black centres made from discs cut from black sprue, plus three lengths each of fine silver jeweller's wire, all superglued on.
In the picture above, the crew, Ian and Pat Appleyard, were made up from a mixture of 1/32 and 1/35 military and civilian plastic kit parts.


And here's what the chassis looks like in place.
Note that I've also added twin exhaust pipes, made from aluminium tube.
Above is the chassis - the older MRRC Cobra one, split across the middle and extended by 1/4 inch, and the drive shaft replaced by by a longer one. The front of the chassis has been discarded by sawing off vertically straight down the front engine mounting; then a sheet of black plastic card welded on, and then a box unit made up to take the MRRC steering front axle. Note the front axle also pivots in a beam axle manner, allowing the front wheels to rock, so making the car self-levelling and able to adjust to twists and bumps in the track. Wheels - these have been faced off with the static kit wheel centres; the front wheels are split vertically, with the screws that the front wheels spin on going through the inner half, and the outer half hiding them; the two wheel halves held together by the tyre ( Cartrix tyres).

Now, to the right, is the chassis and the cockpit and its crew all painted up.
The wheels have been done in Vallejo off-white acrylic, the colour which will, obviously, be used on the body as well. The hub caps are done with chrome Bare-metal foil.
The cockpit and crew have been painted up with various matt enamel and acrylic colours, with leather sheen and any gloss being done with Klear acrylic floor polish and Humbrol Gloss Cote.
Finished !
The shell was keyed off for painting by working over it with 1200-grade fine wet&dry paper, and then washed / degreased. It was then undercoated with matt white enamel from a spray can.
The body colour finish is, as mentioned, Vallejo off-white acrylic, done in three diluted coats, with panel lines emphasised with a sepia fineliner pen, and glossed off with three coats of Klear acrylic floor polish.
Chroming is done with chrome Bare-metal foil, and a good silver paint on the fiddly bits; all chrome has been overcoated with Humbrol Gloss cote varnish, to toughen it up and help it stay on.
The final bit of detailing was done after painting, namely making up windscreen wipers from chromed plastic scrap bits and silver-plated jeweller's wire.


